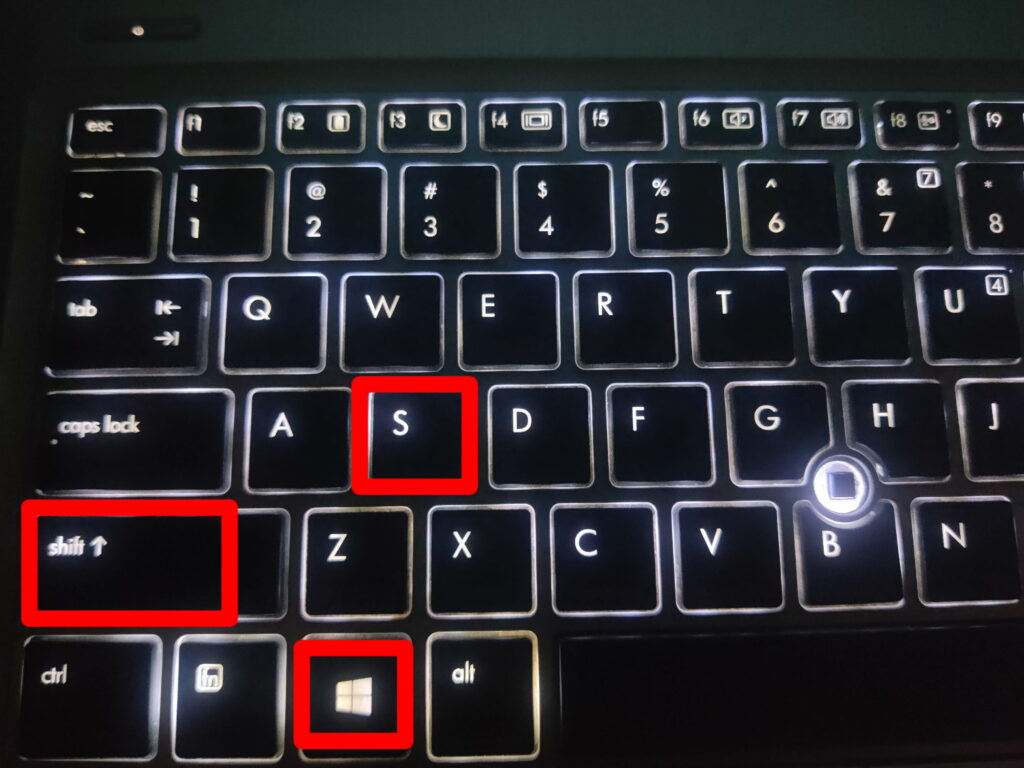
To take a screenshot on an HP laptop, press Windows + Print Screen (PrtSc) to capture and save the entire screen automatically. To capture only part of the screen, press Windows + Shift + S and select the area you want. You can also use the Snipping Tool for advanced screenshot options. These methods work on most HP laptops running Windows 11 and Windows 10, including the HP Pavilion, Envy, Spectre, EliteBook, ProBook, Victus, and Omen series.
Taking screenshots is one of the most useful features on any computer. Whether you want to save an online receipt, capture an error message, share something with a friend, or create a tutorial, knowing how to screenshot on an HP laptop can save time and improve productivity.
The good news is that you don’t need to install any extra software. Windows includes several built-in screenshot tools that make capturing your screen quick and easy. Depending on your needs, you can take a screenshot of the entire screen, a single window, or just a selected area.
In this guide, you’ll learn every way to take screenshots on an HP laptop, where screenshots are saved, how to edit them, and how to fix common screenshot problems. Whether you’re a beginner or an experienced Windows user, this step-by-step guide will help you choose the best method for every situation.
Read Our Guide On:
Is Nimo a Good Laptop Brand? Honest Guide
Why You Might Need to Take a Screenshot
Screenshots are useful in many everyday situations. Instead of explaining what’s on your screen, you can capture it instantly and share it with others.
Common reasons to take screenshots include:
- Saving important information before it changes
- Sharing error messages with technical support
- Capturing online receipts or order confirmations
- Saving study notes or presentation slides
- Sharing conversations or social media posts
- Creating tutorials or work documentation
- Recording high scores while gaming
- Reporting software bugs
Because screenshots are saved as image files, they’re easy to share through email, messaging apps, cloud storage, or social media.
Screenshot Keyboard Shortcuts at a Glance
If you’re looking for the fastest method, use the table below.
| Keyboard Shortcut | What It Does | Automatically Saves? |
|---|---|---|
| PrtSc | Copies the entire screen to the clipboard | ❌ |
| Windows + PrtSc | Captures the full screen and saves it | ✅ |
| Alt + PrtSc | Captures only the active window | ❌ |
| Windows + Shift + S | Opens the Snipping Tool for selecting part of the screen | ❌ |
| Windows + G | Opens Xbox Game Bar for screenshots while gaming | ✅ |
| Fn + PrtSc | Works on some HP laptops where the Print Screen key shares another function | Depends on the method |
Tip: If one shortcut doesn’t work, try holding the Fn (Function) key while pressing PrtSc, as some HP laptop keyboards require it.
Method 1: Use Windows + Print Screen to Capture the Entire Screen
For most users, this is the easiest and fastest way to take a screenshot.
Best for
- Saving the entire desktop
- Work documents
- Online receipts
- Tutorials
- Beginners
Steps
- Arrange everything you want to capture on your screen.
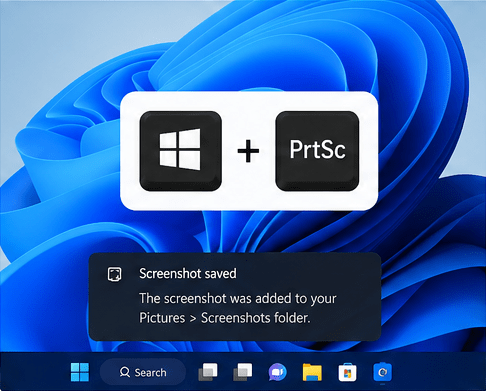
- Press Windows + PrtSc at the same time.
- Your screen will briefly dim, indicating that the screenshot has been taken.
- Windows automatically saves the screenshot.
You don’t need to paste the image into Paint or another app because Windows saves it immediately.
Where Is the Screenshot Saved?
Open File Explorer and navigate to:
This PC → Pictures → Screenshots
Each screenshot is saved as a PNG image with a numbered filename.
Why Use This Method?
This method is ideal because it requires only one keyboard shortcut and automatically saves your screenshot without any extra steps.
Pros
- Very fast
- Automatically saves the image
- Excellent image quality
- No additional software needed
Cons
- Captures the entire screen only
- Doesn’t allow editing before saving
Method 2: Use the Print Screen (PrtSc) Key
The traditional Print Screen key has been available in Windows for many years and remains one of the easiest ways to capture your screen.
Unlike the previous method, this shortcut copies the screenshot to your clipboard instead of saving it automatically.
Best for
- Copying screenshots into documents
- Emails
- Microsoft Word
- PowerPoint presentations
- Messaging apps
Steps
- Press the PrtSc key.
- The entire screen is copied to the clipboard.
- Open an application such as:
- Microsoft Paint
- Microsoft Word
- PowerPoint
- Photoshop
- Paint 3D
- Press Ctrl + V to paste the screenshot.
- Save the file if needed.
When Should You Use This Method?
Choose this option if you don’t want Windows to create image files automatically and only need the screenshot temporarily.
For example, if you’re replying to an email or preparing a document, pasting directly into your application saves time.
Advantages
- Simple to use
- Doesn’t create unnecessary files
- Works with almost every Windows application
Disadvantages
- Must be pasted before use
- Easy to lose if you copy something else
Method 3: Capture Only One Window with Alt + Print Screen
Sometimes you don’t want to capture your entire desktop. Instead, you only need one application window.
For example, you may want to capture:
- A browser window
- Microsoft Excel
- Microsoft Word
- Settings
- File Explorer
- A software error message
This is where Alt + Print Screen becomes useful.
Best for
- Office work
- Customer support
- Software tutorials
- Error reporting
- Online meetings
Steps
- Click the window you want to capture so it’s active.
- Press Alt + PrtSc.
- The active window is copied to the clipboard.
- Open Paint, Word, or another application.
- Press Ctrl + V.
- Save the screenshot if necessary.
Only the selected window is captured, while the rest of your desktop is excluded.
Why Use Alt + Print Screen?
This shortcut creates cleaner screenshots because it removes unnecessary distractions from your desktop.
Instead of cropping the image later, Windows captures only the active application.
Pros
- Cleaner screenshots
- Faster editing
- Perfect for tutorials and presentations
Cons
- Doesn’t save automatically
- Requires pasting into another application
Which Screenshot Method Is Best?
If you’re unsure which shortcut to use, this comparison can help.
| If You Want To… | Best Method |
|---|---|
| Capture the entire screen and save it instantly | Windows + PrtSc |
| Copy the entire screen without saving | PrtSc |
| Capture only one application window | Alt + PrtSc |
| Edit before saving | Windows + Shift + S (Snipping Tool) |
For most people, Windows + Print Screen is the easiest option because it automatically saves your screenshot, while Windows + Shift + S offers the most flexibility for capturing specific parts of the screen.
Method 4: Use the Snipping Tool (Windows + Shift + S)
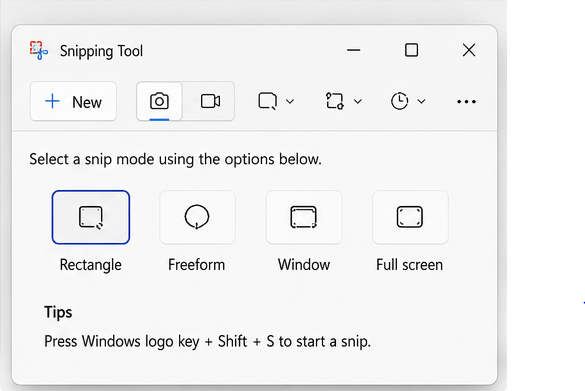
If you need more control over your screenshots, the Snipping Tool is one of the best built-in tools in Windows 11 and Windows 10. It lets you capture only the part of the screen you need, making it ideal for work, school, and everyday tasks.
Best for
- Capturing part of the screen
- Editing screenshots before saving
- Tutorials and guides
- Sharing specific information
- Removing unnecessary content
How to Open the Snipping Tool
There are two easy ways:
Option 1: Keyboard Shortcut
Press:
Windows + Shift + S
Your screen will dim slightly, and a small toolbar will appear at the top of the screen.
Option 2: Start Menu
- Click Start.
- Search for Snipping Tool.
- Open the app.
- Click New to begin taking a screenshot.
Snipping Tool Capture Modes
The Snipping Tool offers four capture modes.
Rectangular Snip
This is the default and most commonly used option.
Simply click and drag your mouse to select the area you want to capture.
Best for:
- Website content
- Documents
- Images
- Product pages
- Online forms
Freeform Snip
This mode lets you draw any shape around the object you want to capture.
It’s useful when you only need a specific part of an image.
Window Snip
Select an open application window, and Windows captures only that window.
This is perfect for:
- Microsoft Word
- Google Chrome
- Excel
- PowerPoint
- Settings
- File Explorer
Full-Screen Snip
Captures your entire display instantly, similar to using the Print Screen key.
How to Edit a Screenshot
One of the biggest advantages of the Snipping Tool is that you can edit your screenshot immediately after capturing it.
You can:
- Crop unwanted areas
- Highlight important information
- Draw with a pen or highlighter
- Add notes
- Erase annotations
- Save the image in different formats
This is especially useful when creating tutorials or reporting software issues.
How to Save Your Screenshot
After editing:
- Click the Save icon.
- Choose a folder.
- Select a file name.
- Save the image.
Supported File Formats
- PNG (recommended for most users)
- JPG
- GIF
Expert Tip: Use PNG for sharper text and screenshots. Use JPG when you need a smaller file size for emails or uploads.
Method 5: Take a Screenshot Without the Print Screen Key
Some HP laptops have compact keyboards where the Print Screen key is shared with another function or is difficult to access.
Fortunately, you can still capture screenshots without using it.
Option 1: Windows + Shift + S
This is the easiest alternative.
Simply press:
Windows + Shift + S
Select the area you want to capture, and Windows copies it to your clipboard.
Option 2: Open the Snipping Tool
Search for Snipping Tool from the Start menu and click New.
Option 3: Use the On-Screen Keyboard
If your keyboard isn’t working:
- Open the On-Screen Keyboard from the Start menu.
- Click the PrtSc key.
- Paste the screenshot into Paint or another application.
Method 6: Use the Xbox Game Bar
Although it was designed for gamers, the Xbox Game Bar can capture screenshots of games, apps, and other windows.
Best for
- PC gaming
- Recording gameplay
- Capturing application windows
- Taking screenshots while using software
Steps
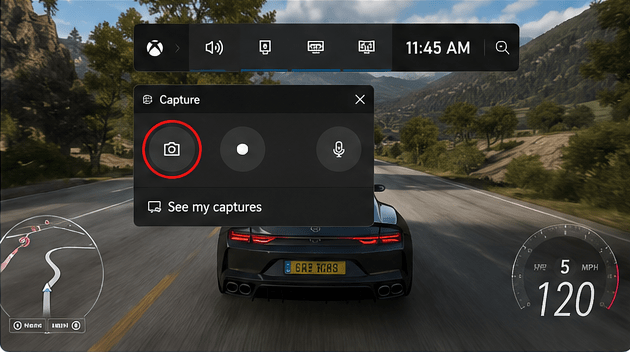
- Press Windows + G.
- The Xbox Game Bar opens.
- Click the Capture widget.
- Select the Camera icon.
Windows saves your screenshot automatically.
Where Are Game Bar Screenshots Saved?
Go to:
This PC → Videos → Captures
Method 7: Use the Function (Fn) Key
Some HP laptops combine the Print Screen key with another keyboard function.
If pressing PrtSc doesn’t work, try:
- Fn + PrtSc
- Fn + Windows + PrtSc
- Fn + Alt + PrtSc
The exact shortcut depends on your HP laptop model.
Where Are Screenshots Saved on an HP Laptop?
The save location depends on the screenshot method you use.
| Screenshot Method | Save Location |
|---|---|
| Windows + PrtSc | Pictures → Screenshots |
| Snipping Tool | Location you choose |
| Xbox Game Bar | Videos → Captures |
| PrtSc | Clipboard only |
| Alt + PrtSc | Clipboard only |
If you can’t find your screenshot, search Windows for “Screenshots” or “.png”.
How to Change the Screenshot Save Location
If you prefer saving screenshots in another folder:
- Open File Explorer.
- Open the Pictures folder.
- Right-click Screenshots.
- Select Properties.
- Open the Location tab.
- Click Move.
- Choose a new folder.
- Click Apply and then OK.
Future screenshots will be saved in the new location.
How to Take a Scrolling Screenshot
Windows doesn’t include a built-in tool for scrolling screenshots.
However, you can still capture an entire webpage using supported browsers or trusted third-party tools.
Browser Features
Some web browsers include built-in webpage capture features.
These allow you to save an entire webpage instead of only the visible portion.
Third-Party Screenshot Tools
Popular options include:
- ShareX
- Greenshot
- PicPick
- Snagit
These applications offer additional features such as scrolling screenshots, annotations, automatic uploads, and keyboard shortcut customization.
Best Screenshot Tools for HP Laptops
If you take screenshots regularly, these tools provide more advanced features than the built-in Windows options.
| Tool | Best For | Free Version |
|---|---|---|
| Snipping Tool | Everyday screenshots | ✅ |
| ShareX | Advanced users | ✅ |
| Greenshot | Productivity | ✅ |
| PicPick | Editing and annotations | ✅ |
| Snagit | Professional work | ❌ |
For most users, the built-in Snipping Tool is more than enough.
Common Screenshot Problems and How to Fix Them
Even though taking screenshots is simple, you may occasionally encounter issues. Here are the most common problems and their solutions.
Print Screen Key Isn’t Working
Try these fixes:
- Press Fn + PrtSc instead.
- Restart your HP laptop.
- Update your keyboard drivers.
- Check if another screenshot application is using the Print Screen key.
- Test the key using the On-Screen Keyboard.
Screenshots Aren’t Saving
If your screenshots aren’t appearing in the Pictures > Screenshots folder:
- Verify you’re using Windows + PrtSc.
- Check if your storage drive is full.
- Look for screenshots in your OneDrive Pictures folder if OneDrive backup is enabled.
- Restart File Explorer or your computer.
Snipping Tool Won’t Open
If the Snipping Tool isn’t responding:
- Install the latest Windows updates.
- Repair or reset the app through Settings > Apps > Installed Apps > Snipping Tool.
- Restart your laptop.
Screenshot Looks Blurry
Blurry screenshots are usually caused by:
- Saving in a low-quality format.
- Resizing the image after capturing it.
- Uploading to apps that compress images.
For the best quality, save screenshots as PNG whenever possible.
Expert Tips for Better Screenshots
Follow these simple tips to create cleaner, more professional-looking screenshots.
- Close unnecessary apps before capturing your screen.
- Hide personal or sensitive information.
- Use the Snipping Tool to capture only the important area.
- Crop extra borders or empty space.
- Highlight important details when sharing instructions.
- Save screenshots with descriptive file names so they’re easier to find later.
- Organize screenshots into folders for work, school, or personal use.
These small habits can make your screenshots easier to understand and more useful for documentation, presentations, and troubleshooting.
Read Our Guide On:
Best Laptops for Students (2026 Buying Guide)
Frequently Asked Questions
How do I take a screenshot on an HP laptop?
The easiest way is to press Windows + PrtSc to capture and automatically save the entire screen. If you only want to capture part of the screen, press Windows + Shift + S and select the area you want.
Where are screenshots saved on an HP laptop?
If you use Windows + PrtSc, screenshots are usually saved in:
This PC → Pictures → Screenshots
Screenshots taken with the Xbox Game Bar are stored in:
This PC → Videos → Captures
If you use PrtSc or Alt + PrtSc, the screenshot is copied to the clipboard and must be pasted into an app before saving.
Why isn’t the Print Screen key working?
Some HP laptops require you to press Fn + PrtSc instead of just PrtSc. If that doesn’t work, check your keyboard settings, update your keyboard drivers, or use the Snipping Tool as an alternative.
How do I take a screenshot without the Print Screen key?
You can press Windows + Shift + S to open the Snipping Tool or launch the Snipping Tool directly from the Start menu. Both methods work even if your keyboard doesn’t have a dedicated Print Screen key.
Can I capture only one window?
Yes. Click the window you want to capture and press Alt + PrtSc. Only the active window will be copied to your clipboard.
How do I take a scrolling screenshot on an HP laptop?
Windows doesn’t include a built-in scrolling screenshot feature. You can use browser tools or trusted screenshot software such as ShareX, Greenshot, PicPick, or Snagit to capture an entire webpage or long document.
Which screenshot format should I use?
For most users, PNG is the best choice because it offers excellent image quality and sharp text. Use JPG when you need a smaller file size for emailing or uploading images.
Can I edit a screenshot before saving it?
Yes. The Snipping Tool allows you to crop, highlight, draw, erase, and annotate screenshots before saving them.
Can I change where screenshots are saved?
Yes. Right-click the Screenshots folder, select Properties, open the Location tab, and choose a new save location.
Do these screenshot methods work on Windows 10 and Windows 11?
Yes. Most screenshot shortcuts and tools work on both Windows 10 and Windows 11. The appearance of the Snipping Tool may differ slightly, but the functionality is nearly identical.
Do these methods work on all HP laptop models?
Yes. These methods work on most HP laptops, including:
- HP Pavilion
- HP Envy
- HP Spectre
- HP EliteBook
- HP ProBook
- HP Victus
- HP Omen
- HP Chromebook (some shortcuts differ on ChromeOS)
Always check your keyboard layout, as some models require the Fn key.
What’s the fastest way to take a screenshot?
If you want to save the entire screen instantly, press Windows + PrtSc. For capturing a specific area, Windows + Shift + S is the fastest and most flexible option.
Read Our Guide On:
How Long Do Laptops Last and How to Extend Lifespan
Final Thoughts
Knowing how to screenshot on an HP laptop can make everyday tasks much easier, whether you’re working, studying, gaming, or troubleshooting a problem. Windows provides several built-in screenshot methods, so you don’t need to install extra software for most situations.
If you’re looking for the quickest solution, Windows + PrtSc is the best choice because it captures and saves the entire screen instantly. For more flexibility, Windows + Shift + S and the Snipping Tool let you capture exactly what you need and edit it before saving.
Try each method to find the one that fits your workflow. Once you’re familiar with these shortcuts and tools, taking screenshots on your HP laptop will become second nature.
Read Our Guide On:
How to Clean Laptop Fan Safely

Mehtab Hassan is the founder and tech writer at Brozly, where he publishes easy-to-understand articles on AI, software, cybersecurity, smartphones, laptops, and emerging technology. His goal is to help readers make smarter tech decisions through detailed reviews, practical tutorials, and beginner-friendly guides. He is passionate about exploring the latest innovations and delivering accurate, up-to-date content that everyone can understand.