A noisy laptop, overheating problems, or slow performance often point to one common issue—a dirty laptop fan. Dust and debris build up inside laptops over time, reducing airflow and making the cooling system work harder.
Learning how to clean a laptop fan is one of the easiest ways to improve cooling, reduce fan noise, and extend your laptop’s lifespan. Whether you own an HP, Dell, Lenovo, ASUS, Acer, MSI, or Apple MacBook, this guide explains safe methods for beginners.
By the end of this article, you’ll know how to clean your laptop fan without causing damage, when to replace it, and how to prevent dust from building up again.
Quick Answer
To clean a laptop fan:
- Shut down your laptop.
- Unplug the charger and remove external devices.
- Open the bottom cover if possible.
- Hold the fan blades still.
- Blow compressed air through the fan and vents.
- Remove remaining dust using a soft anti-static brush.
- Reassemble the laptop and test the fan.
Avoid using a household vacuum cleaner or spinning the fan at high speed with compressed air.
Why Cleaning Your Laptop Fan Matters
Your laptop’s cooling fan removes heat from the CPU and GPU. When dust blocks the fan or air vents, temperatures rise quickly.
A clean fan provides several benefits:
- Better cooling performance
- Quieter operation
- Faster overall performance
- Less thermal throttling
- Longer battery life in some cases
- Extended hardware lifespan
Ignoring dust buildup may eventually cause overheating, unexpected shutdowns, and hardware damage.
Signs Your Laptop Fan Needs Cleaning
Watch for these warning signs:
- Fan runs loudly most of the time
- Laptop becomes very hot underneath
- Frequent overheating warnings
- Slow performance during simple tasks
- Laptop shuts down unexpectedly
- Hot air barely comes out of the vents
- Fan constantly speeds up and slows down
If your laptop shows several of these symptoms, cleaning the fan should be your first troubleshooting step.
Tools You’ll Need
Before starting, gather these items:
Recommended
- Compressed air can
- Soft anti-static brush
- Microfiber cloth
- Precision screwdriver set
- Plastic opening tool
- Small container for screws
Optional
- Anti-static wrist strap
- Isopropyl alcohol (90% or higher)
- Flashlight
Avoid metal tools that may scratch internal components.
Safety Tips Before Cleaning
Follow these precautions:
- Turn off the laptop completely.
- Disconnect the charger.
- Remove the battery if it is removable.
- Work on a clean, dry surface.
- Ground yourself to prevent static electricity.
- Never spray liquids directly inside the laptop.
- Keep track of all screws.
These simple steps reduce the risk of accidental damage.
How to Clean a Laptop Fan Without Opening the Laptop
Many modern laptops allow basic cleaning through the air vents.
Step 1: Shut Down the Laptop
Power off the device completely.
Do not use Sleep or Hibernate mode.
Step 2: Disconnect Everything
Remove:
- Charger
- USB devices
- SD cards
- External monitors
Step 3: Locate the Air Vents
Most laptops have vents on:
- Bottom panel
- Rear edge
- Side edges
These are where dust usually collects.
Step 4: Blow Compressed Air
Insert the straw nozzle near the vent.
Use short bursts instead of continuous spraying.
Hold the fan blades still if possible to prevent overspinning.
Rotate the laptop slightly while cleaning from different angles.
Step 5: Test the Laptop
Turn the laptop back on.
If fan noise has decreased and airflow has improved, you’ve successfully removed loose dust.
How to Clean a Laptop Fan by Opening the Laptop
This method removes stubborn dust and provides the best results.
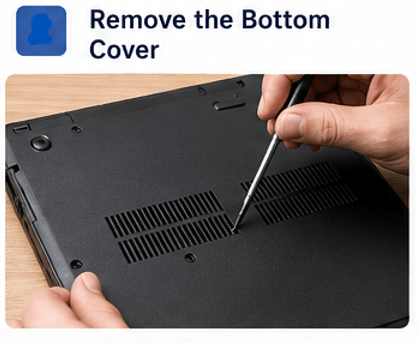
Step 1: Remove the Bottom Cover
Unscrew the bottom panel carefully.
Some laptops use hidden screws beneath rubber feet.
Use a plastic pry tool instead of metal objects.
Step 2: Disconnect the Battery
If accessible, disconnect the battery cable.
This improves safety while working.

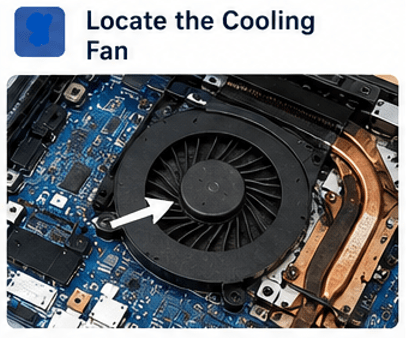
Step 3: Locate the Cooling Fan
Most laptops have one or two cooling fans connected to a heat sink.
Inspect them carefully for dust buildup.
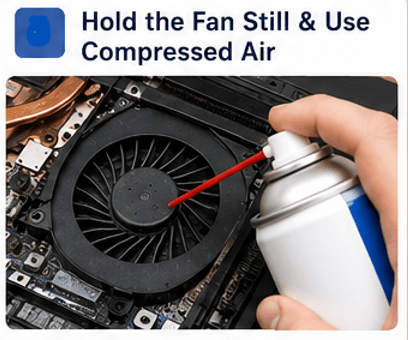
Step 4: Hold the Fan Still
Never allow compressed air to spin the fan rapidly.
Hold the blades gently with a plastic tool or finger.
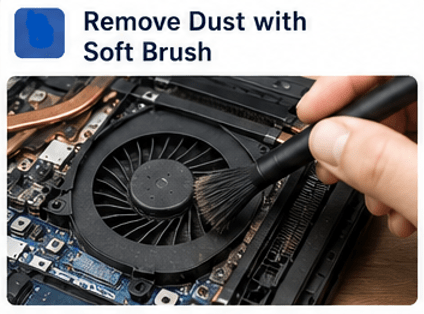
Step 5: Remove Dust
Use:
- Compressed air
- Soft anti-static brush
- Microfiber cloth
Brush dust away from the fan blades and heat sink fins.
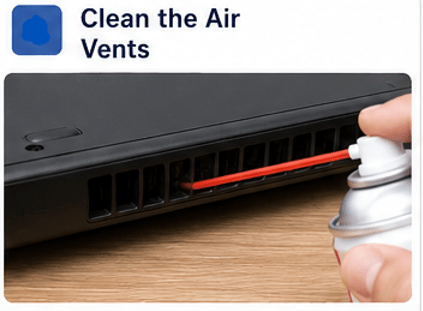
Step 6: Clean the Air Vents
Dust often collects inside the exhaust vents.
Blow compressed air from both directions until airflow is clear.
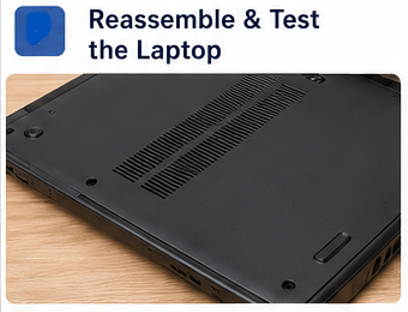
Step 7: Reassemble the Laptop
Reconnect the battery.
Replace the bottom cover.
Tighten screws evenly without overtightening.
Step 8: Verify Cooling Performance
Start the laptop.
Listen for quieter fan operation.
Monitor temperatures during regular use.
Can You Use a Vacuum Cleaner?
No.
Household vacuum cleaners can generate static electricity that may damage sensitive electronic components.
Instead, use:
- Compressed air
- Anti-static brush
- Electronics-safe air blower
How Often Should You Clean Your Laptop Fan?
The ideal schedule depends on your environment.
| Environment | Cleaning Frequency |
|---|---|
| Clean office | Every 12 months |
| Average home | Every 6–12 months |
| Homes with pets | Every 3–6 months |
| Smoky or dusty areas | Every 3 months |
| Heavy gaming use | Every 4–6 months |
How to Clean Laptop Fan on Popular Brands
HP Laptop
HP laptops often have bottom access panels that make cleaning relatively simple.
Some ultrabooks require removing the entire bottom cover.
Dell Laptop
Most Dell Inspiron and Latitude models provide easy fan access after removing several screws.
Lenovo Laptop
Lenovo ThinkPad models are generally service-friendly.
IdeaPad models may require additional clips to open safely.
ASUS Laptop
Gaming laptops from ASUS usually have larger cooling systems that collect more dust over time.
Acer Laptop
Many Acer laptops allow quick bottom panel removal for fan cleaning.
MSI Gaming Laptop
Gaming laptops often include dual fans.
Clean both fans and all cooling fins thoroughly.
Apple MacBook
MacBooks require special screwdrivers.
If you’re unfamiliar with Apple repairs, consider professional cleaning.
Should You Replace Thermal Paste Too?
If your laptop is:
- More than 3 years old
- Still overheating after cleaning
- Frequently throttling
Replacing thermal paste may further improve cooling.
However, beginners should only attempt this after learning the proper procedure.
Common Mistakes to Avoid
Many people accidentally damage their laptops during cleaning.
Avoid these mistakes:
- Using a household vacuum
- Spraying liquids inside
- Spinning the fan with compressed air
- Forgetting to disconnect power
- Using excessive force
- Losing screws
- Touching electronic components unnecessarily
How to Prevent Dust Buildup
Preventive maintenance reduces future cleaning.
Good habits include:
- Use your laptop on hard surfaces.
- Avoid placing it on beds or blankets.
- Keep your workspace clean.
- Store your laptop in a sleeve.
- Clean room air filters regularly.
- Avoid smoking near your laptop.
- Use a cooling pad if needed.
What If the Fan Is Still Loud?
Cleaning may not solve every issue.
Possible causes include:
Worn Fan Bearings
Older fans eventually wear out and become noisy.
Replacement may be necessary.
High CPU Usage
Background apps can keep temperatures high.
Check Task Manager for excessive CPU usage.
Blocked Heat Sink
Dust inside the heat sink can still restrict airflow.
Deep cleaning may be required.
Old Thermal Paste
Dry thermal paste reduces heat transfer.
Replacing it often improves cooling.
Malware
Some malware keeps the processor busy continuously.
Run a trusted antivirus scan.
When to Seek Professional Help
Professional service is recommended if:
- The laptop is under warranty.
- You are uncomfortable opening it.
- The fan cable is damaged.
- Liquid has entered the laptop.
- The fan has stopped spinning.
- Temperatures remain extremely high after cleaning.
Read Our Guide On:
How to Screenshot on HP Laptop
Frequently Asked Questions
Can I clean my laptop fan without opening the laptop?
Yes. You can remove light dust using compressed air through the vents, although opening the laptop provides a more thorough cleaning.
Is compressed air safe for laptop fans?
Yes, as long as you use short bursts and prevent the fan blades from spinning rapidly.
Can dust damage a laptop?
Yes. Excessive dust blocks airflow, increases temperatures, reduces performance, and may shorten hardware life.
How long does laptop fan cleaning take?
Most cleanings take between 20 and 45 minutes, depending on your laptop model.
Why is my laptop still overheating after cleaning?
The problem may be old thermal paste, a failing fan, blocked heat sink fins, or heavy CPU usage.
Can I use a hair dryer?
No. Hair dryers can create static electricity and may blow moisture or excessive heat into the laptop.
Does cleaning improve gaming performance?
Yes. Better cooling helps reduce thermal throttling, allowing the CPU and GPU to maintain higher performance.
Should I lubricate the fan?
Generally, no. Most laptop fans are sealed and do not require lubrication.
Read Our Guide On:
Best Laptops for Students (2026 Buying Guide)
Final Thoughts
Knowing how to clean a laptop fan is a valuable maintenance skill that helps keep your device cool, quiet, and running efficiently. Regular cleaning removes dust that blocks airflow, prevents overheating, and can extend the life of your laptop.
For most users, cleaning the fan every 6 to 12 months is enough. If you have pets, live in a dusty environment, or use your laptop for gaming, more frequent cleaning is recommended.
By using compressed air, a soft anti-static brush, and safe handling practices, you can maintain your laptop’s cooling system with confidence and avoid many common performance issues before they become serious.
Read Our Guide On:
How Long Do Laptops Last and How to Extend Lifespan

Mehtab Hassan is the founder and tech writer at Brozly, where he publishes easy-to-understand articles on AI, software, cybersecurity, smartphones, laptops, and emerging technology. His goal is to help readers make smarter tech decisions through detailed reviews, practical tutorials, and beginner-friendly guides. He is passionate about exploring the latest innovations and delivering accurate, up-to-date content that everyone can understand.